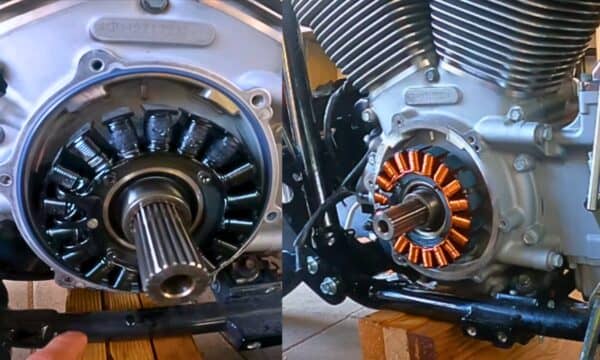
The stator in a Harley Davidson is a critical component of the motorcycle’s charging system. It’s essentially a generator, converting mechanical energy from the engine’s rotation into electrical energy.
This electrical energy is used to charge the battery and power the electrical system while the engine is running.

The stator is located on the engine crankcase and works in conjunction with the rotor, another component of the charging system.
When the rotor spins around the stator, it generates an alternating current (AC). This AC is then converted into direct current (DC) by the rectifier to charge the battery and power the electrical system.
The stator also plays a role in regulating the voltage output of the charging system to prevent overcharging of the battery.
In this article, we will discuss in detail the method of replacing a stator on a Harley Davidson.
Let’s dive into:
Step By Step Method to Replace a Stator on a Harley Davidson
To replace a stator on a Harley Davidson motorcycle, you’ll need a few key tools and materials.
First, ensure that you have a complete set of screwdrivers with various sizes, both flat-head and crosshead.
You will also need a socket set and an Allen wrench set. A multimeter will be essential to check the continuity of the new stator before installation.
As for materials, purchase a new stator suitable for your Harley Davidson model. Finally, grab a can of brake cleaner for cleaning purposes, and a thread locker to secure the screws during reassembly.
After having all the things needed to replace the stator follow these steps to replace it.
1. Disconnect the Battery
The first step in replacing the stator involves disconnecting the battery. Make sure the motorcycle is turned off and then remove the negative cable first, followed by the positive cable.
2. Remove the Outer Primary Cover
Depending on your Harley model, you might need a Torx or Allen wrench for this task. Remove the screws retaining the cover in a criss-cross pattern to avoid warping.
3. Drain the Primary Fluid
Place an oil pan under the motorcycle and open the drain plug. Then allow the primary fluid to fully drain out.
4. Remove the Clutch Assembly
Use a clutch spring compressor to relieve tension from the clutch spring, and then remove the snap ring. Slide the clutch assembly off the main shaft.
5. Remove the Compensator
The compensator is bolted onto the end of the crankshaft. Use an impact wrench to remove the compensator bolt, and then slide the compensator off the crankshaft.
6. Remove the Rotor
With the compensator out of the way, you can now remove the rotor. The rotor is a magnetic part that sits over the stator. Handle it with care to avoid damaging it.
7. Remove the Stator
The stator is fastened with Torx screws. Remove these screws, and you can lift the stator right out. After removing the older stator you should replace it with the new one and follow the above steps to assemble it back.
Upgrading Your Harley’s Stator
Upgrading to a 50 amp stator on your Harley Davidson can significantly enhance your motorcycle’s battery performance.
This upgrade is particularly beneficial for those who often engage in long-distance rides or who have additional electrical accessories installed on their bike.
It increases the electrical generation capacity, ensuring the battery remains fully charged and ready to deliver optimal performance.
This can result in smoother rides, improved engine performance, and extended battery life. One of the main advantages of a 50 amp upgrade is its ability to handle heavy electrical loads.
With this upgrade, your motorcycle’s charging system can produce more power, making it ideal for powering additional accessories such as heated gear, GPS units, or sound systems.
Moreover, a stronger stator also means that your bike’s battery will have more reserve power to pull from.
This is especially useful for those who often ride in stop-and-go traffic or frequently make short trips where the battery may not have enough time to fully charge.
What to do When Choosing a Stator?
There are several things you should keep in mind while choosing the right stator for your Harley model.
The very first thing to consider is the model of your motorcycle. Different Harley models require different types of stators.
Make sure to cross-reference your model with the stator’s compatibility list. Secondly, look into the power output of the stator.
An upgrade should ideally offer a higher output than your current one, providing better performance.
Ensure the stator upgrade has positive reviews for durability and reliability. A high-quality stator will be resistant to heat and vibration, two common factors leading to stator failure.
Here are some commonly recommended stator upgrades for popular Harley models:
- For the Sportster 1200 and 883, a V-Twin Manufacturing Alternator Stator upgrade offers increased power output and durability
- The Twin Power High Output Stator is a popular choice for Dyna models, offering improved electrical system performance
- If you own a Road King or Street Glide, the Cycle Electric Stator upgrade is a reliable option with excellent reviews for its longevity
- For those riding a Softail, the Ultima Alternator Stator upgrade is highly rated for its heat-resistant design and increased output.
With the right stator upgrade, you can enhance your Harley Davidson’s performance and enjoy a smoother ride.
Troubleshooting and Common Issues
Dealing with Loctite can be a tricky part of the process when replacing a stator on a Harley Davidson.
To effectively remove Loctite, apply localized heat using a heat gun or hair dryer. It will help to break up the compound and enable easier removal.
When dealing with tightly fixed parts, it’s advised to use a penetrating oil. Spray it onto the affected area and allow it to sit for a few minutes.
However, be cautious not to force the parts too much, as this can cause damage. Instead, gently apply pressure and increase it gradually until the part comes loose.
It’s important to have all the necessary tools and equipment before beginning the stator replacement process.
Another important aspect of replacing a stator is ensuring proper alignment. It includes aligning the rotor and stator properly to ensure they function correctly together.
One common mistake when replacing a stator is neglecting to disconnect the battery before beginning.
This can lead to electrical shorts or even personal injury. Always start by disconnecting the battery to ensure a safe working environment.
Cost Considerations for Stator Replacement
The cost of the stator part itself ranges from $100 to $200, depending on the model of your Harley.
Labor costs can significantly increase the overall price, with professional mechanic services charging anywhere from $200 to $500.
Besides, if you choose to tackle the replacement yourself, you’ll need tools for the job. A complete motorcycle tool set might set you back about $100, but these tools can be used for other repairs and maintenance tasks as well.
Other Cost-Saving Tips
If the cost of replacing a stator seems out of reach, there are some ways you can save money on the task.
One option is to purchase a used stator from a reputable source. However, keep in mind that used parts may have wear and tear, so it’s essential to thoroughly inspect the stator before installing it.
Secondly, you can opt for a rebuild kit instead of buying a new stator. These kits are generally cheaper but require more technical knowledge and skills to install correctly.

Ahtsham Younas is a passionate blogger and content writer. He loves to ride motorcycles and learn the mechanical process behind the motorcycles.
He has been writing articles in the motorcycle industry since 2019 and has learned many things about motorbike niches.


